gpt分区安装win7教程:教你gpt分区安装系统
Recently, a little white left a message saying that win7 cannot be installed in the gpt partition! Most of the computers on the market are uefi motherboards, and the hard disk partition table corresponding to the installation system is gpt. Some users want to install the win7 system in the gpt partition, but they do not know how How to operate! First of all, let\'s take a look at the disk format of GPT partition, which is a popular partition format in the past two years. It adopts uefi+gpt boot mode, and it is also the default disk format of win10 system when major brand computers leave the factory. When we install win7 with gpt partition, we should pay attention to using uefi boot mode, and some computers must turn off "safe boot" and turn on "compatibility mode" to successfully install win7 with gpt partition, so what should we do in this case? Explain the reason why the gpt partition cannot install win7 and the solution.
gpt分区无法成功安装win7系统的原因分析及注意事项:
1、gpt是GUID disk partition table的缩写,是硬盘分区表的标准。如果使用gpt分区使用uefi+gpt启动方式。
2、2016年以后的新机型gpt分区安装win7时,注意关闭bios中的“安全启动”和打开“兼容模式”。注意:在某些bios环境下,开启uefi启动模式后,无法开启“兼容模式”,所以我们在gpt分区安装win7时需要注意注入usb驱动和显卡驱动,您可以使用本站的win7系统。
3、部分U盘不支持gpt修复启动。一定要使用修复过的支持gpt分区的U盘启动盘制作pe启动盘。
4、uefi+gpt分区安装只支持win6 74位或win10 64位操作系统,不支持win7 32位和win10 32位系统。
1、win7系统gpt分区安装BIOS设置注意事项(以华硕主板为例,每台机器bios不同,但设置方法相同。2016年以后的新机型,gpt分区安装win7时,注意启动模式为uefi并关闭安全启动,有些机器需要打开兼容模式才能安装成功)
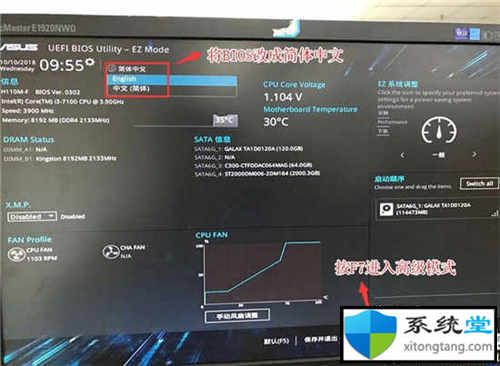
1、重启华硕电脑按esc或f8进入BIOS设置,将bios改为简体中文,然后按F7进入高级模式,如下图;
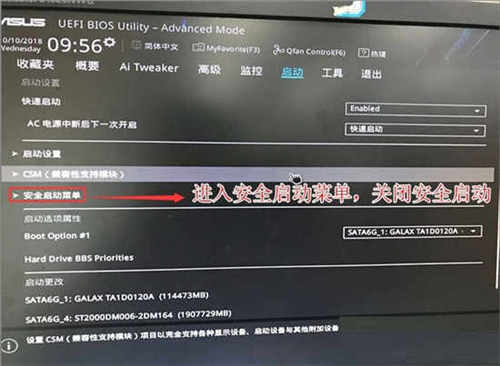
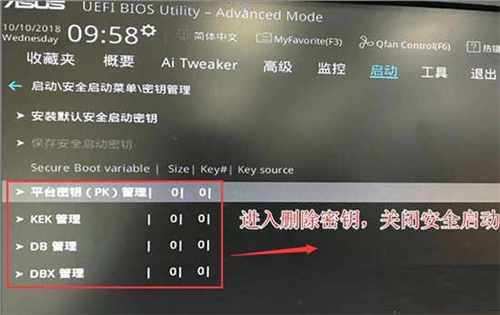
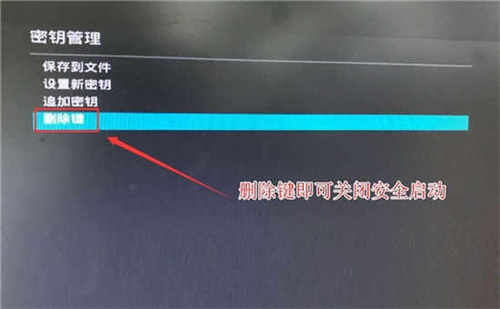
2、进入高级模式后,按→方向键移动到“启动”选项,选择Secure Boot菜单,然后回车进入密钥管理,清除密钥并关闭Secure Boot;
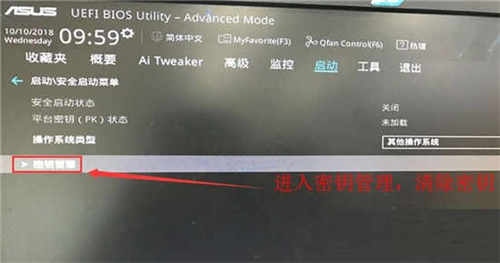
3、回到“Safe Boot Menu”选项,将操作系统类型改为“Other Operating Systems”,如下图;

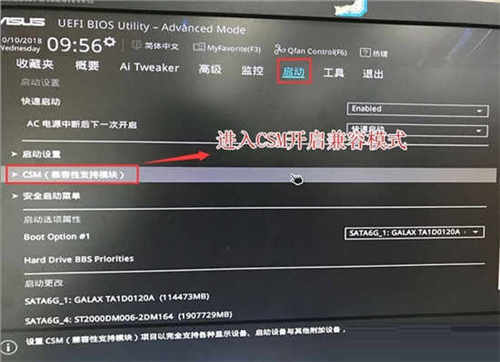
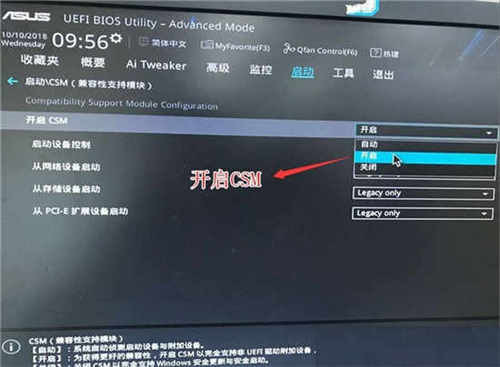
4.回到“开始”选项,将CSM从禁用更改为启用,并启用兼容模式。使用gpt在uefi模式下安装win7。这里一定要开启“兼容模式”,如下图;
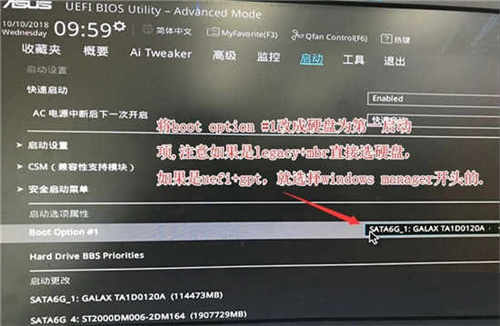
4、继续将boot option#1选项改为普通启动,将第一个启动项设置为普通硬盘启动。如果使用uefi+gpt,必须用Windwos Boot Manager选择UEFI启动分区,然后按F10保存设置;
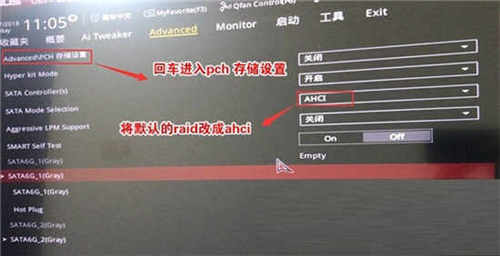
5、按→方向键移动到高级选项,找到pach存储设置,将sata模式选择硬盘模式从raid改为ahci硬盘模式,避免出现找不到硬盘的情况PE,如下图所示;
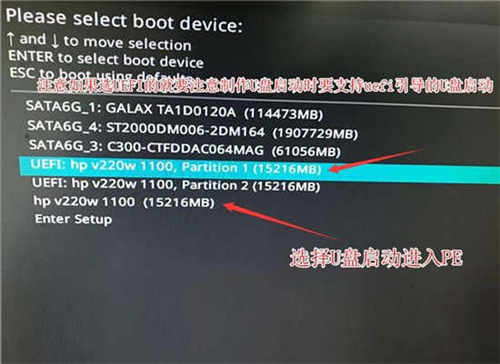
6、插入U盘启动盘,重启后按ESC选择识别的U盘启动项,回车;
2.在gpt分区安装win7,将硬盘分区格式改为gpt分区(注意分区改为gpt后bios启动方式必须为uefi)
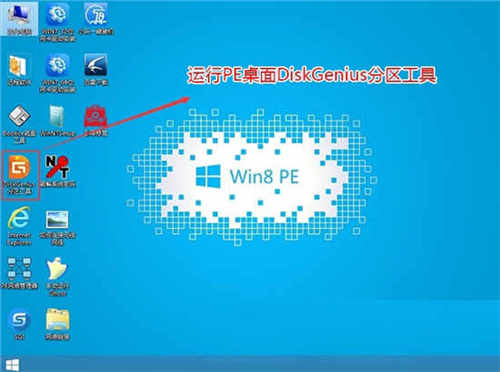
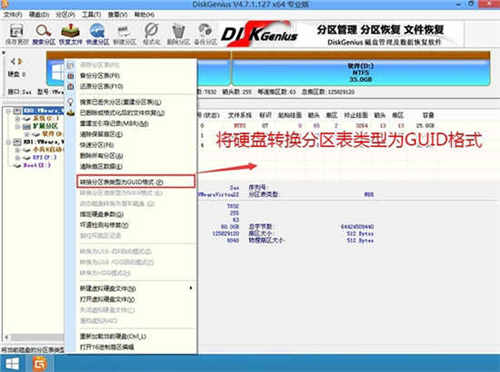
1、选择USB启动盘进入PE后,在桌面运行DiskGenius分区工具,点击菜单栏中的【硬盘】,选择【将分区表类型转换为guid格式】,然后保存修改,如图在下图中;

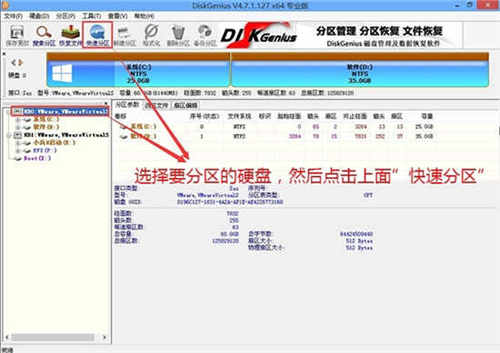
2、然后选择要分区的硬盘,点击上方的【快速分区】,如下图;
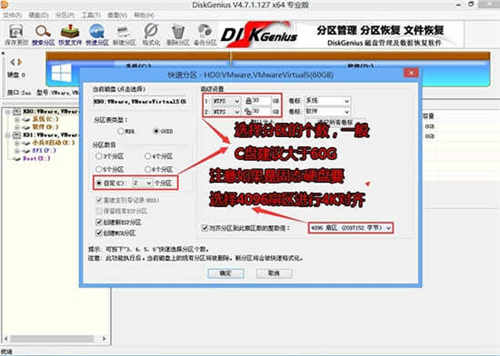
3、在弹出的【快速分区】界面中,我们选择分区GUID的类型以及分区的数量和大小。这里一般建议C盘大小大于60G,然后注意如果是固态盘需要4K对齐,如下图;
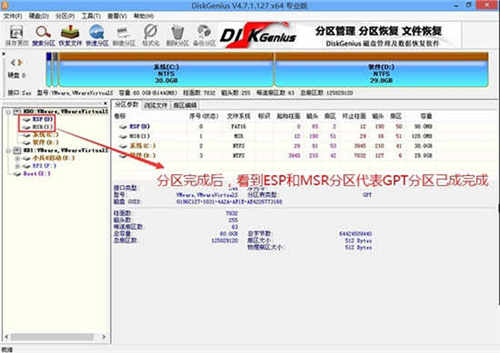
4、分区完成后,可以看到ESP和MSR分区代表GPT分区完成,如下图;

三、gpt分区安装WIN7系统步骤
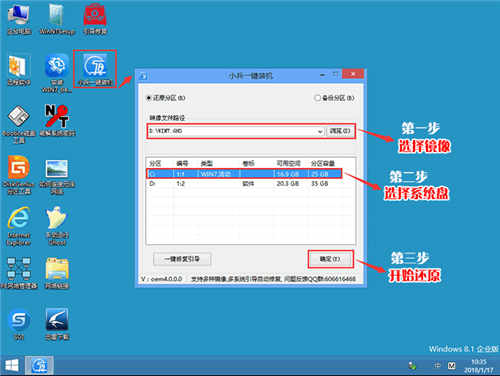
1、在桌面运行“小兵一键安装”工具,然后先点击浏览,在U盘中找到我们下载的ghost版本的iso或者gho文件,使用c盘作为系统盘,安装c盘中的win7系统,点击确定,如图:
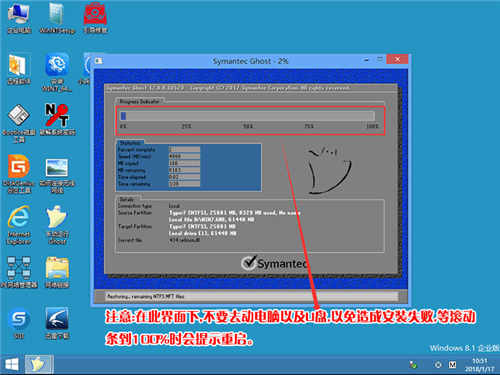
2、最后等待GHO安装程序发布,安装程序自动修复gpt启动。这是gpt分区可以安装win7的进步。修复后会提示重启并启动安装系统。
3、安装后提示加载成功,整个过程自动完成,直到看到桌面,如下图:
以上就是gpt分区无法安装win7的原因分析及解决方法。安装过程中注意使用uefi+gpt启动模式并关闭安全启动(兼容模式的电脑必须开启),部分U盘启动盘不支持uefi+gpt修复,容易安装失败,
- 上一篇

win7电脑喇叭没声音怎么恢复
一开始是喇叭里有声音,后来我插上耳机听了一个多小时。拔下耳机后,扬声器没有声音,但插入耳机后,仍然没有声音。什么情况?下面小编就给大家详细介绍一下!操作方法:1.右键单击[电脑],然后单击[属性]。2...
- 下一篇
win7下共享虚拟机提示无法启动VMware Workstation Server共享服务
VMwareWorkstation是一款功能强大的桌面虚拟电脑软件。如果你需要虚拟机产品,不妨下载VMwareWorkstation试用一下,希望你喜欢。部分用户安装使用虚拟机后,发现共享虚拟机时弹出VMwareWorkstationServer共享服务无法启动...